Configuring Audience Claims
ENTERPRISE This is an EJBCA Enterprise feature.
The following covers how EJBCA uses OAuth authentication and how to set audience (aud) claims.
How EJBCA uses OAuth Authentication
Like all OAuth-enabled services, EJBCA enables access to clients who present a Bearer token in a header when communicating with the EJBCA web server. A Bearer token is a data object signed by a trusted Identity Provider like Azure, PingID, KeyCloak, etc that contains information about the user. By checking the signature on the Bearer token, EJBCA confirms that the network communication containing that token has been sent by the user or by some third-party to whom the user has given the token, intending that third-party to act as that user. In the case of EJBCA's Admin or RA sites, the Bearer token is created when the user is redirected to the third-party authentication service's login page and is sent to EJBCA when that login page redirects the browser back to EJBCA. In the case of EJBCA's web APIs, the bearer token must be acquired by some custom integration and sent as an HTTP header when making API calls.
This means that a Bearer token is a very sensitive object and that its value should be kept secret. Its value is only known to the current user (it is contained in the browser) and to the destination application, like EJBCA, which needs to view the bearer token value to confirm its validity. Thus, when logging in via OAuth, EJBCA now has that bearer token and can in theory act as the current user to any other application that is integrated with the same OAuth provider. And vice versa, when a user logs into some other application using OAuth, that application now has a bearer token that could in theory be sent to EJBCA to act as that user. This configuration assumes a lot of trust amongst applications using the same OAuth provider.
Audience (aud) Claim
To provide additional security in the above scenario, OAuth providers provide an aud, or "Audience", claim in the bearer token when the user logs in. The aud claim is a value that states what application the bearer token is intended for. For example, if your organization's email system uses OAuth for logins, the login screen might say "Allow this application to read and send emails" and the aud claim might be set to email. That bearer token would then be presented to the email system to authenticate the user, but only for email purposes.
If EJBCA is configured to only allow users presenting a bearer token containing the aud claim ejbca, the bearer token known by the email system could no longer be sent to EJBCA to make API calls on behalf of the logged-in user. The aud claim constrains what application the bearer token is intended for and allows the same single sign-on system to be safely used by multiple applications without opening up trust between all systems a user has access to.
Disabling the Audience Claim Checking
Some OAuth providers (in particular, Ping Identity) do not set the aud claim when the user logs in. In this case, EJBCA cannot check that bearer tokens presented by a user are intended for EJBCA authentication only. In such a case, care should be taken when OAuth is used for EJBCA authentication, since other applications using the same Identity Provider may be able to act as a logged-on user with EJBCA.
Setting the Audience
The following covers how to get Azure and KeyCloak to set the audience.
Configuring Azure to Set the Audience
Azure will set the aud claim to the Application ID URI value in your Registered Applications screen. This is the ID that Azure uses to identity EJBCA for your single sign-on integration. When Azure creates a bearer token during user login, the bearer token is intended for EJBCA, a fact that is asserted by Azure by setting aud to that ID.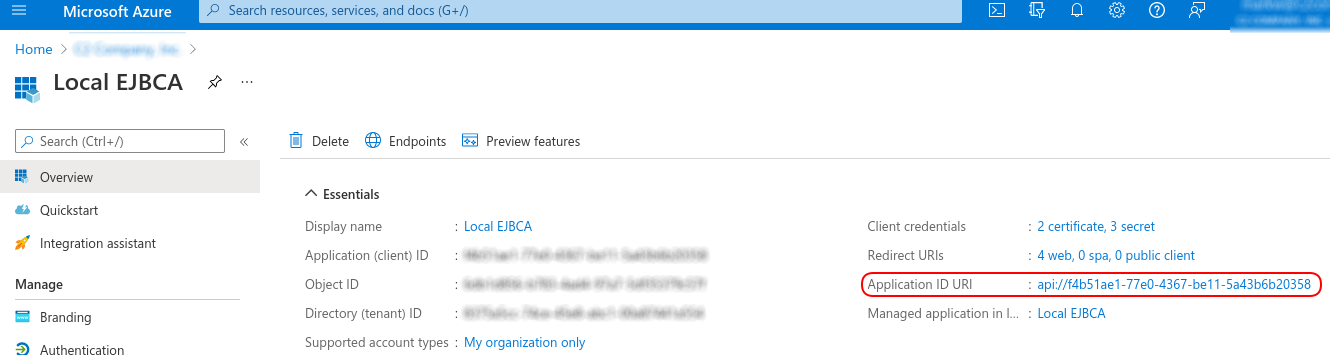
Configuring KeyCloak to Set the Audience
By default, KeyCloak will not set an aud claim in the Bearer token on login. To configure KeyCloak to set the aud claim, follow these steps:
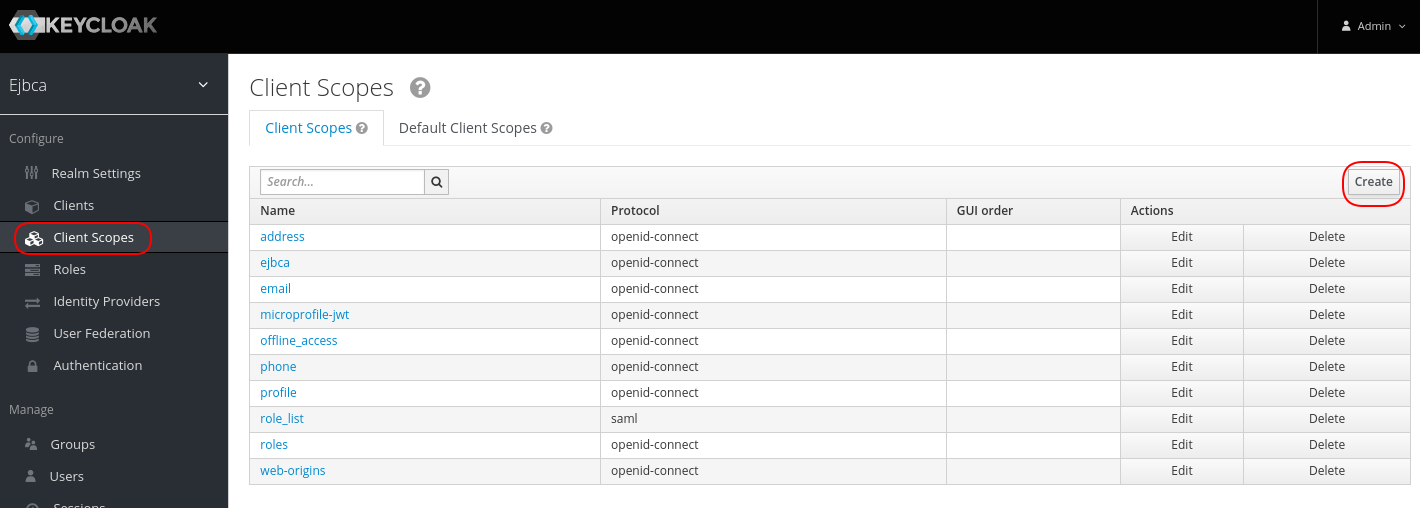
Add a Client Scope in the Client Scopes screen. Give it a meaningful name, something like ejbca.
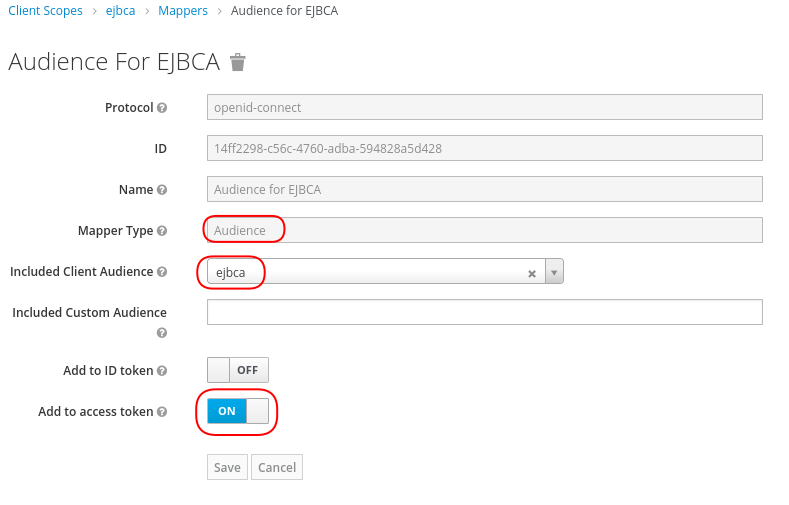
Go to the Mappers tab and create a new mapping with a name like "Audience for EJBCA". Set the mapper type to Audience and the Included Client Audience to the name selected when EJBCA was configured as a KeyCloak application (in the Clients menu). Ensure that Add to access token is ON.
Click the Clients menu item, select the EJBCA client configured previously, and click the Client Scopes tab. Add the scope created above (ejbca, in our example), to the Default Client Scopes.

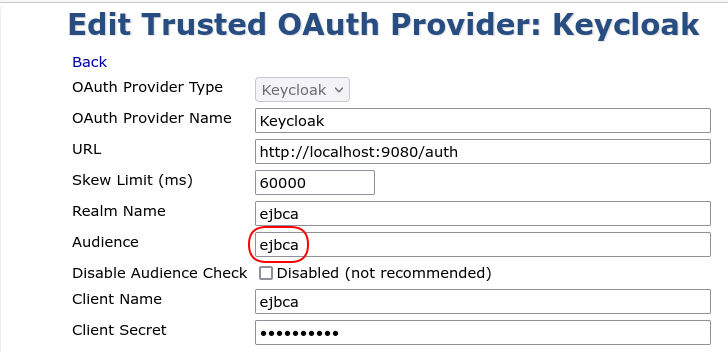
Set the scope name (ejbca, in our example), created above, in the Audience field in the KeyCloak Trusted OAuth Provider entry in EJBCA.
This lets KeyCloak know that a login may be tied to EJBCA (that is, have a "scope" of ejbca) and if a login is being made to EJBCA, that the value ejbca should be put in the aud claim.)