Managing C-ITS ECAs
ENTERPRISE This is an EJBCA Enterprise feature.
The following outlines key C-ITS PKI functions in EJBCA and how to set up and manage C-ITS operations in EJBCA to enable secure vehicle-to-everything (V2X) communication for Cooperative Intelligent Transport Systems (C-ITS).
For an overview of C-ITS PKI architecture, concepts, and C-ITS certificate structure, see C-ITS ECA Overview.
C-ITS PKI in EJBCA
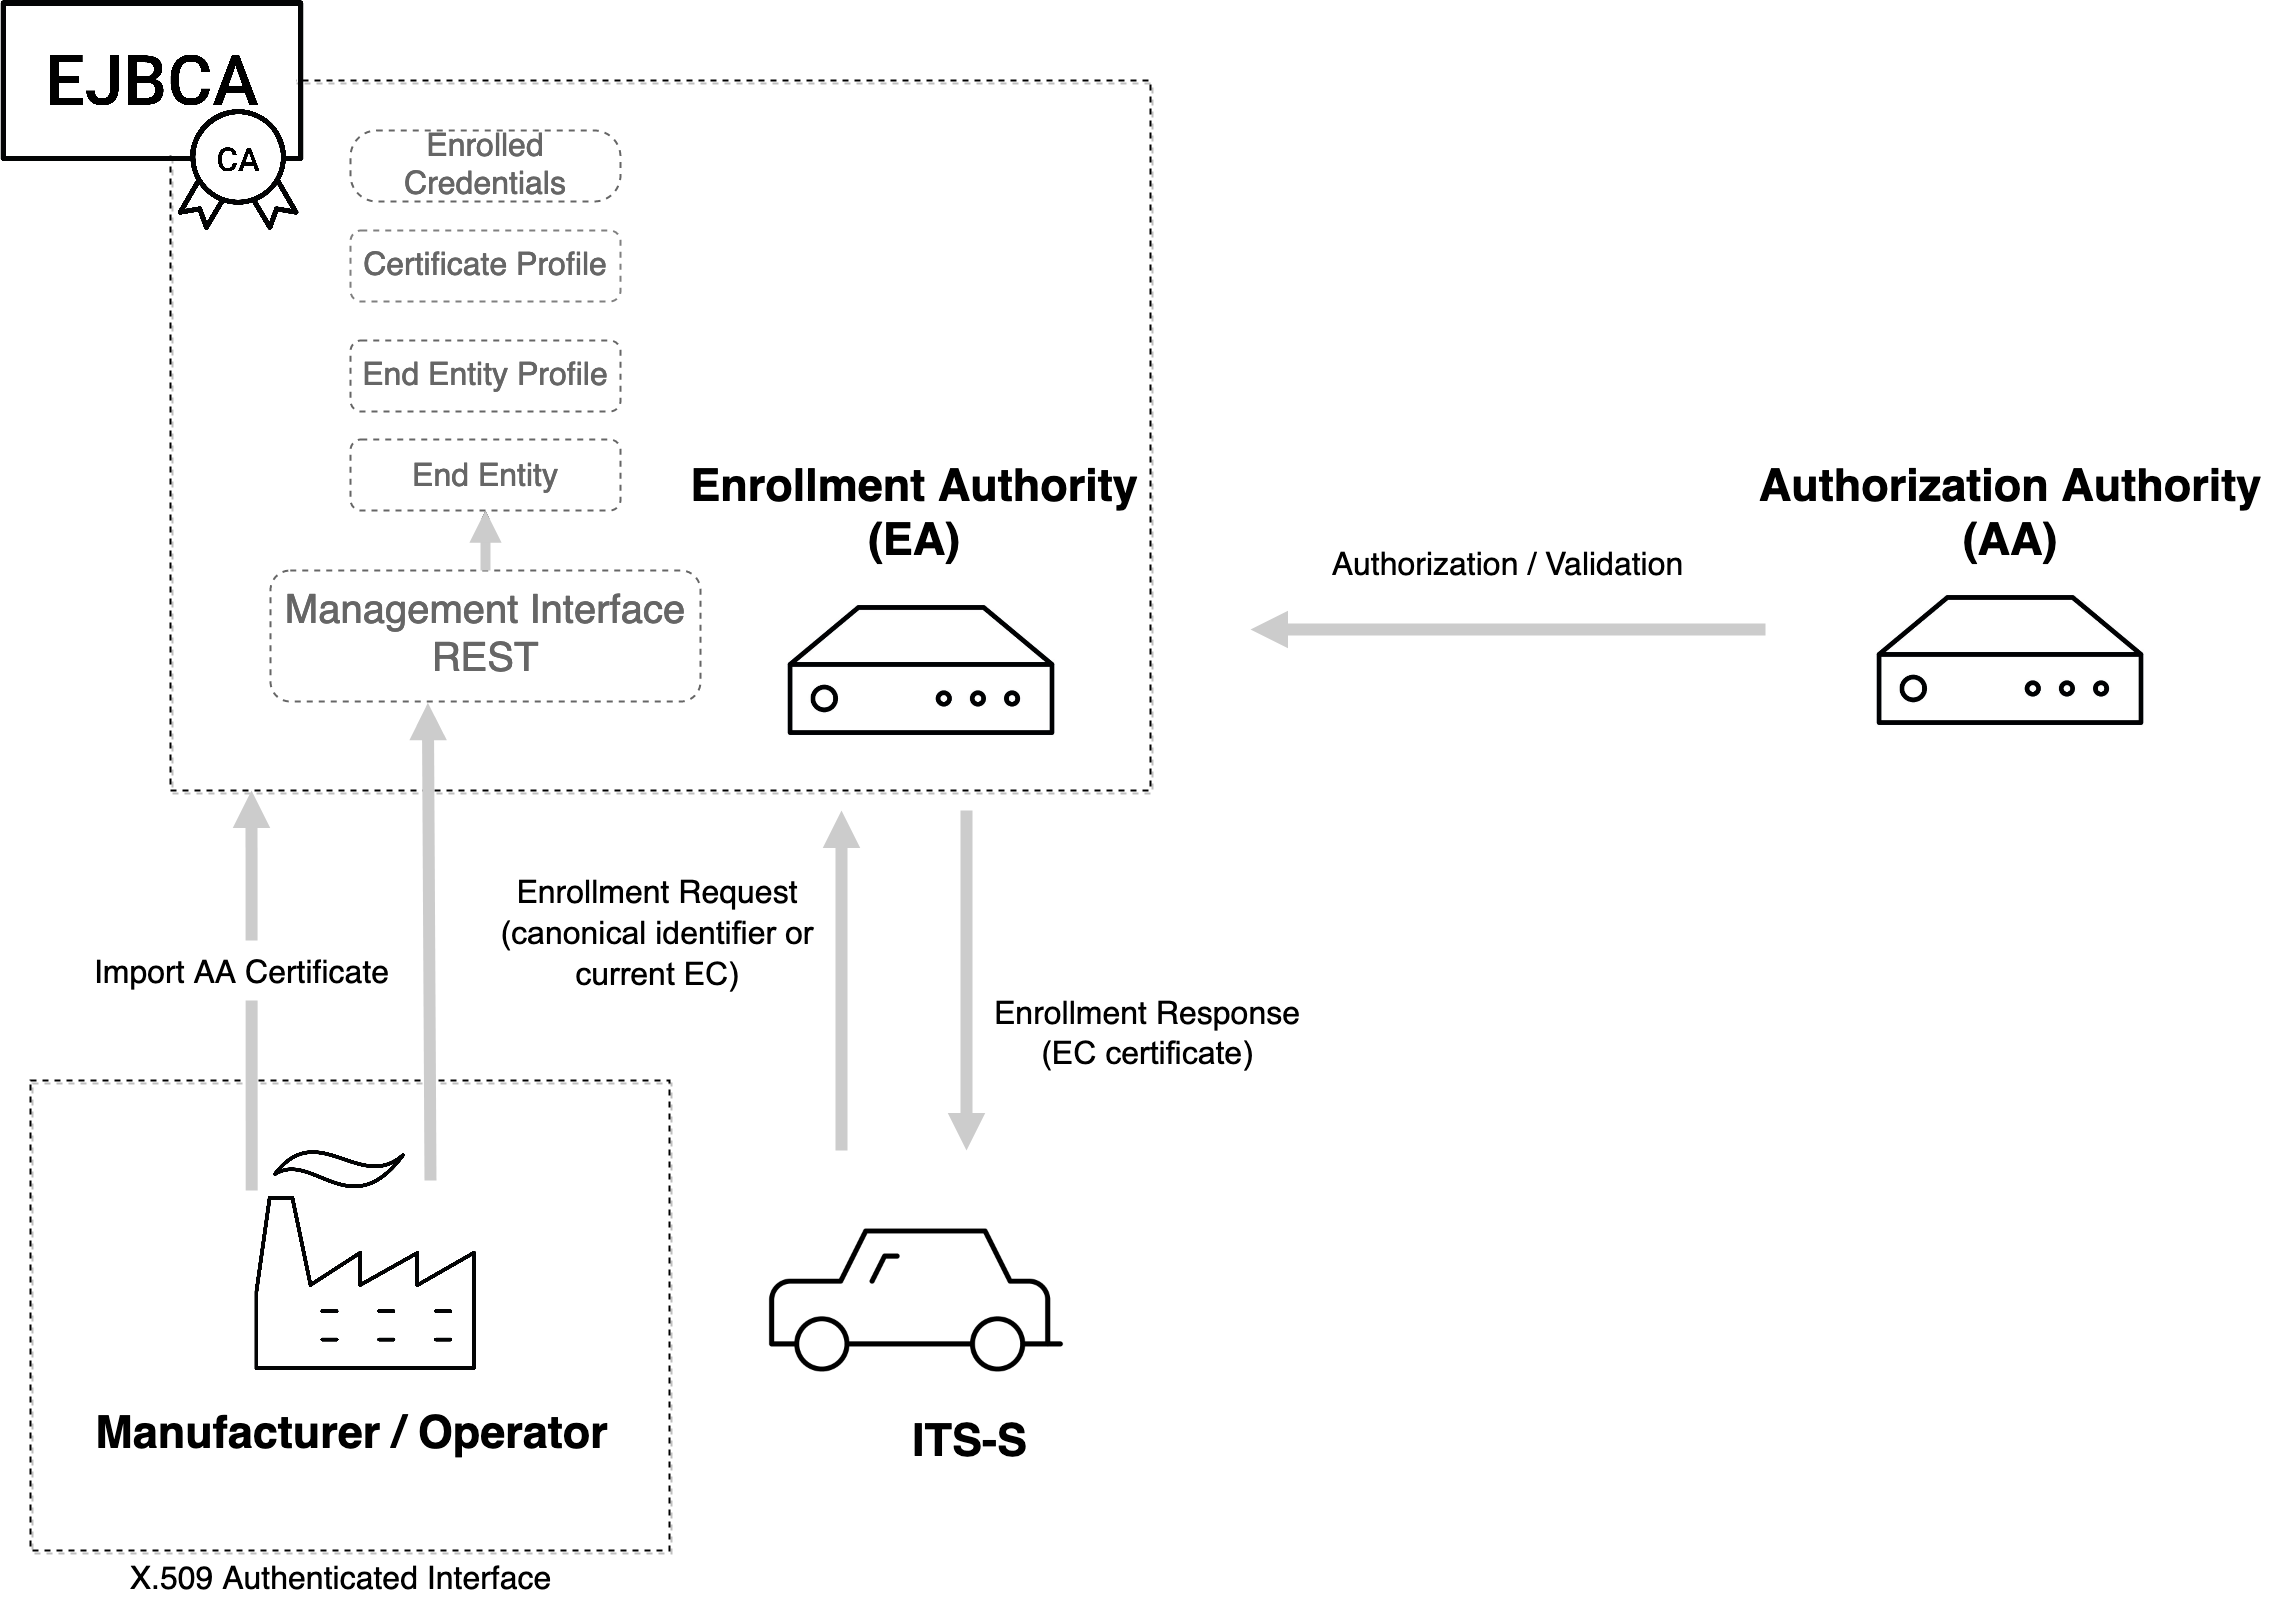
EJBCA allows creating an Enrollment Authority (EA) in a C-ITS PKI, registering ITS entities, and issuing enrollment credentials. The following outlines the four key C-ITS PKI functions implemented by EJBCA.
For a general overview of the C-ITS PKI architecture and actors involved, see C-ITS ECA Overview.
Enrollment Authority Creation: EJBCA allows for the creation of an EA. However, the EA certificate must be signed by an external Root CA and this is done off-band. During the creation of the EA, a printable signed CSR is generated and made available as an OER encoded binary file to be downloaded.
Registration of ITS-S: ETSI mentions that EA must know the ITS-S in terms of a globally unique canonicalId and a canonical public key. The definition of this procedure is considered out of scope by ETSI and IEEE 1609.2. In EJBCA, this is referred to as registration and is done through REST Interface endpoints, referred to as Management Interface in the overview below.
Issuance of Enroll Credential: ITS-S contacts EA over network to get an EC. The network address or URL is configured by the manufacturer in the ITS-S. The enrollment request is encrypted by EA's public encryption key and signed by the canonical public key during initial enrollment, and later signed by the verification key of the currently enrolled credential. EJBCA validates various constraints imposed by the certificate profile and details registered by the manufacturer, before issuing the credential. This is performed over HTTP protocol with TLS.
Authorization / Validation: The ITS-S contacts AA with an authorization request and then AA contacts EA for validation of the request. In EJBCA, this is performed over HTTP protocol with TLS. The AA certificate must be imported to EJBCA beforehand and the end entity must have a valid EC.
C-ITS Operations in EJBCA
The following sections provide step-by-step instructions on how to perform C-ITS operations in EJBCA.
Prerequisites
Before you begin, EJBCA should be deployed in a local WildFly server as a CA, see Deploying EJBCA.
Create and Configure Enrollment Certification Authority (ECA)
Setting up the Enrollment Certification Authority (ECA) in EJBCA involves the following three steps:
The EA certificate must be signed by an external Root CA and this is done off-band. During the creation of the ECA, a printable signed CSR is generated and made available as an OER encoded binary file to be downloaded. The CA certificate request must be signed by an external Root CA and then imported to EJBCA to enable the EA to issue enrollment credentials (EC).
Create ITS Certificate Profile
To create an ITS certificate profile, do the following:
Click Certificate Profiles under CA Functions to open the Manage Certificate Profiles page.
To add the new certificate profile, specify a name for the profile at the bottom row, and click Add.
Find your new certificate profile in the list, and click Edit.
Edit the settings according to the following:
As Type for the profile, select ITS.
In the Validity or end date of the certificate field, enter the maximum validity of the ITS-S certificate or EC, for example 2y 5h.
Select the relevant Application Permissions to be considered when a certificate is used for certain C-ITS applications like cooperative message sending.
Select the relevant Certificate Issuing Permissions to restrict what certificates the CA can issue.
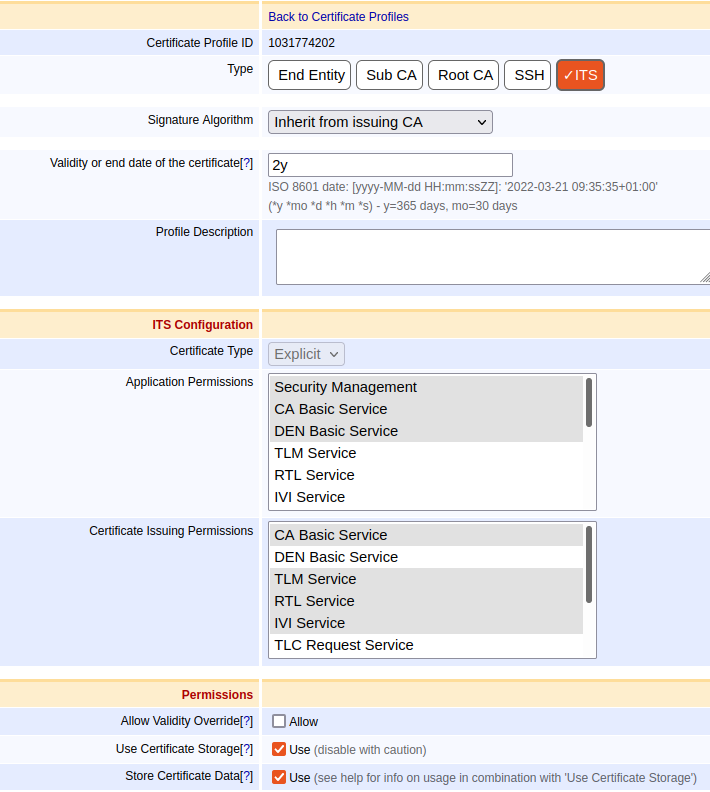
Click Save to store the settings and view the new certificate profile in the list.
Create ECA
To create the Enrollment Certification Authority (ECA), do the following:
Click the menu option Certification Authorities under CA Functions to open the Manage Certification Authorities page.
In the Add CA field, enter a name for the CA and click Create.
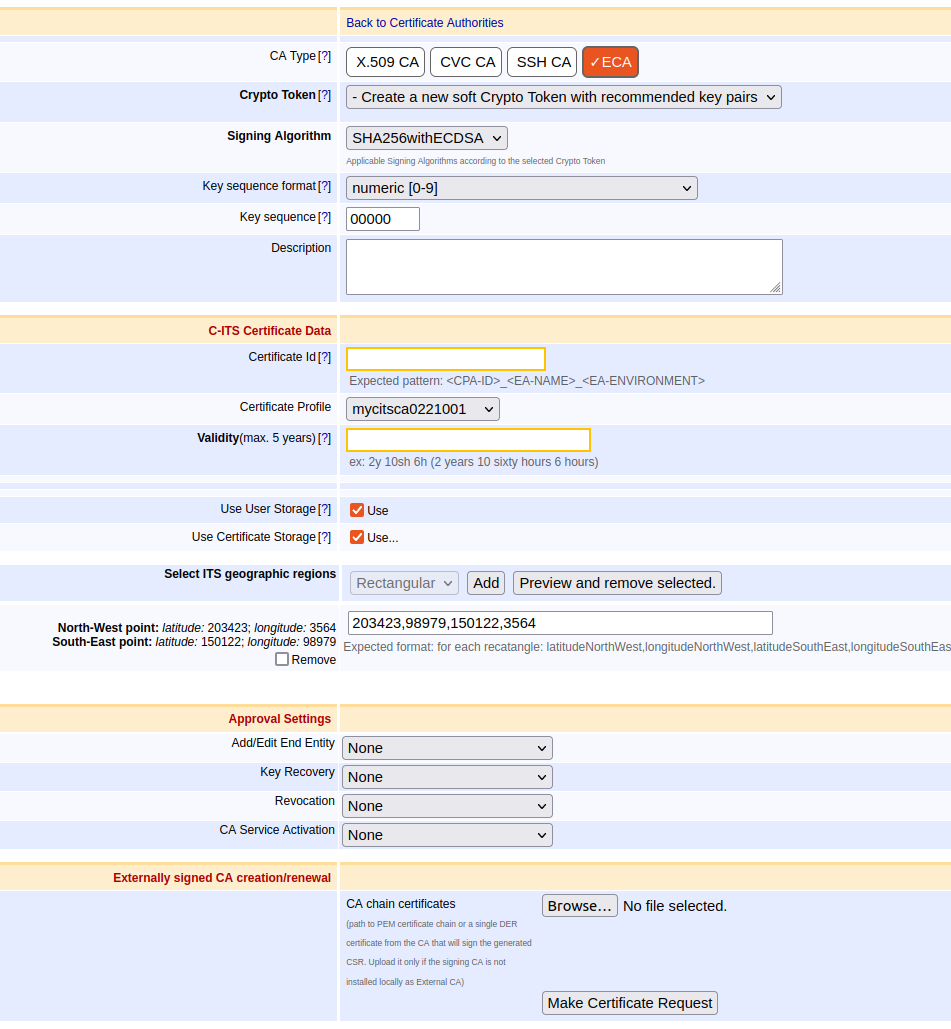
On the Create CA page, specify the following:
As CA Type, select ECA.
If no Crypto Token is selected, a soft token will be generated based on the signing algorithm. For example, NIST P256 for SHA256withECDSA and Brainpool384r1 for SHA384withECDSA.
Under C-ITS Certificate Data, specify the following:
The Certificate Id needs to be globally (not just in EJBCA) unique and will be included in the CSR and thus in the certificate.
Select the newly created Certificate Profile.
Specify the Validity Period.
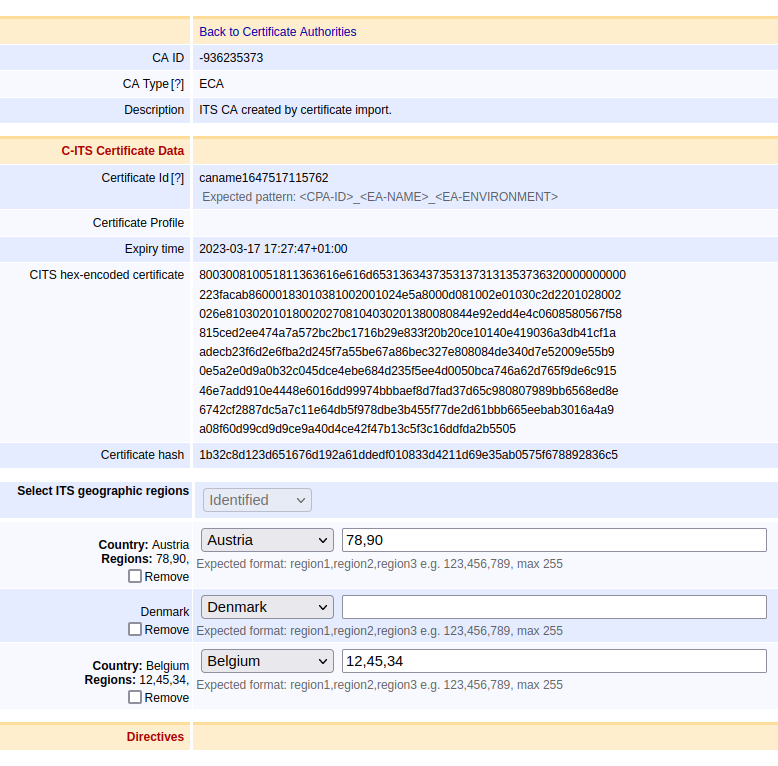
Optionally, indicate in which geographic region the certificate is valid in the section Select ITS geographic regions:
Select a type, click Add and input the region in the specified format in the text field. EJBCA supports circular, rectangular, and identified European countries. A Circular region is not a sequence like the other regions and multiple entries can be added by clicking Add. To remove an entry, select Remove and click Preview and remove selected.
Next, click Make certificate request to create the signed Certificate Signing Request (CSR). The CSR is created according to ETSI 102 941 (section 6.2.1).
Download the signed CSR by clicking Download binary file.
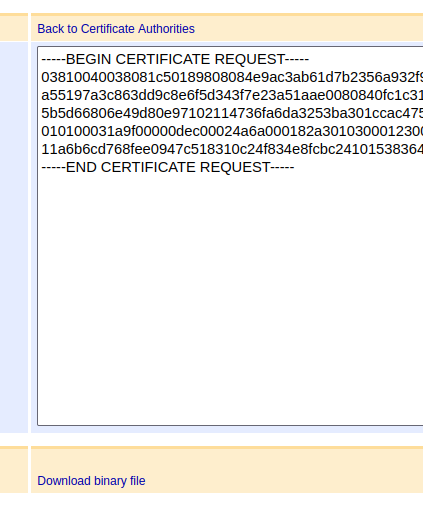
Click Create at the bottom of the page to finalize the CA.
The created ECA is now displayed in the List of Certificate Authorities on the Manage Certificate Authorities page.
In order to proceed to the next step, the CA Certificate request must be signed by an external RCA.
Import CA Certificate
Select the menu option CA Functions > Certificate Authorities, and click Edit CA of the CA you created in the Create ECA section.
Scroll to the bottom of the CA properties page.
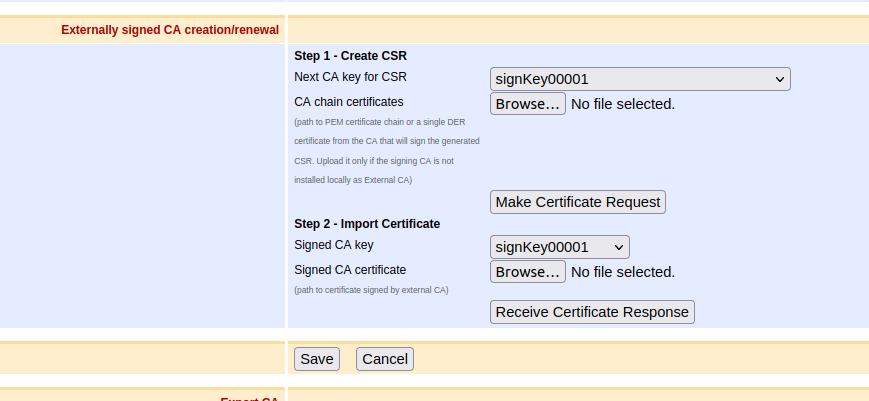
In the section Externally signed CA creation/renewal:
In section Step 2 - Import Certificate, click Browse to select the signed certificate file.
Click Receive Certificate Response to import the externally signed CA certificate and activate the CA.
Once the certificate is uploaded, you can inspect the certificate on the Edit CA page:

The Certificate hash displays the CA identifier, HashedId8. It is the last (right-most) 16 characters, thus 8 bytes.
The Expiry time displays the date and time for expiry.
To rollover the CA certificate, create another CSR by clicking Make Certificate Request to automatically generate a new key pair for encryption and verification and then import that certificate using the steps above. Subsequent certificate upload using the steps above will automatically rollover the CA certificate.
Note that in the uploaded certificate, the certificateId and public keys (both encryption and verification keys) are validated. This allows the Root CA to set different appPermissions and certIssuePermissions than the request ones. The updated permissions are not shown in the user interface.
Import AA Certificate
The AA certificate needs to be imported to allow the authorization validation request from the AA to be verified.
Import of the AA certificate is
required for authorization/validation in step Enrollment and Authorization Validation.
To import the AA certificate:
Click the menu option Certification Authorities under CA Functions to open the Manage Certification Authorities page.
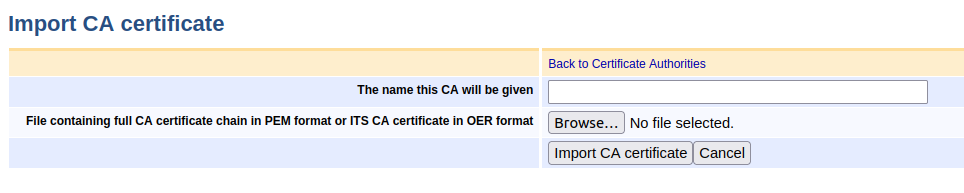
C lick Import CA Certificate.
Specify a unique name of the CA and click Choose file to upload the OER file containing the certificate.
Click Import CA certificate.
The CA is listed on the Manage Certification Authorities page and can be viewed by clicking Edit CA.
Register ITS-S End Entity
Registration of an ITS Station (ITS-S) End Entity is done by the Operator or Manufacturer. A collection of REST endpoints are created to manage these entities.
The following describes how to enable ITS Endpoints in EJBCA and access the EJBCA ITS REST Interface in Swagger in non-production mode. For more information on the EJBCA Certificate Management REST API, see EJBCA REST Interface.
Enable ITS Endpoints
To enable ITS REST endpoints:
Click EJBCA System Configuration and select the Protocol Configuration tab.
Enable the ITS Certificate Management protocol.
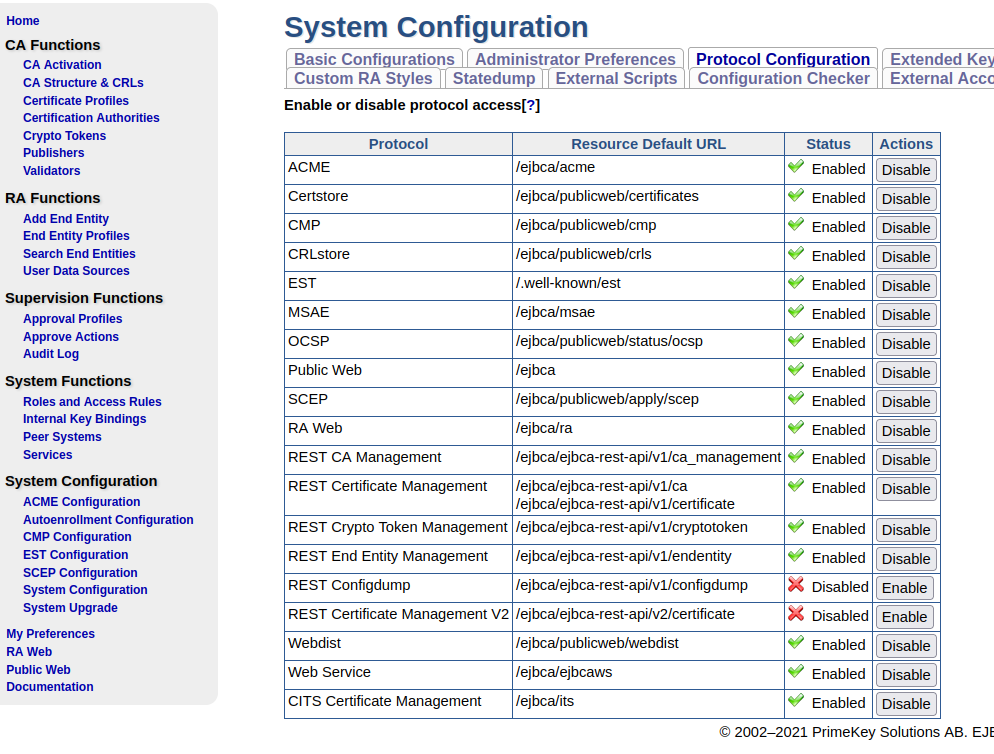
Enabling the ITS Certificate Management protocol enables the end entity management and operations described in ETSI 102 941 like enrollment or authorization validation.
Next, create an end entity profile and then register your first ITS-S.
Create End Entity Profile
Click Edit End Entity Profiles under RA Functions.
In the Add Profile field, specify a name for your end entity profile, and click Add.
Find the new end entity profile in the List of End Entity Profiles, and click Edit.
Edit the settings according to the following:
Enable Batch generation (clear text pwd storage).
In the Subject DN Attributes section, disable Required for CN, Common name.
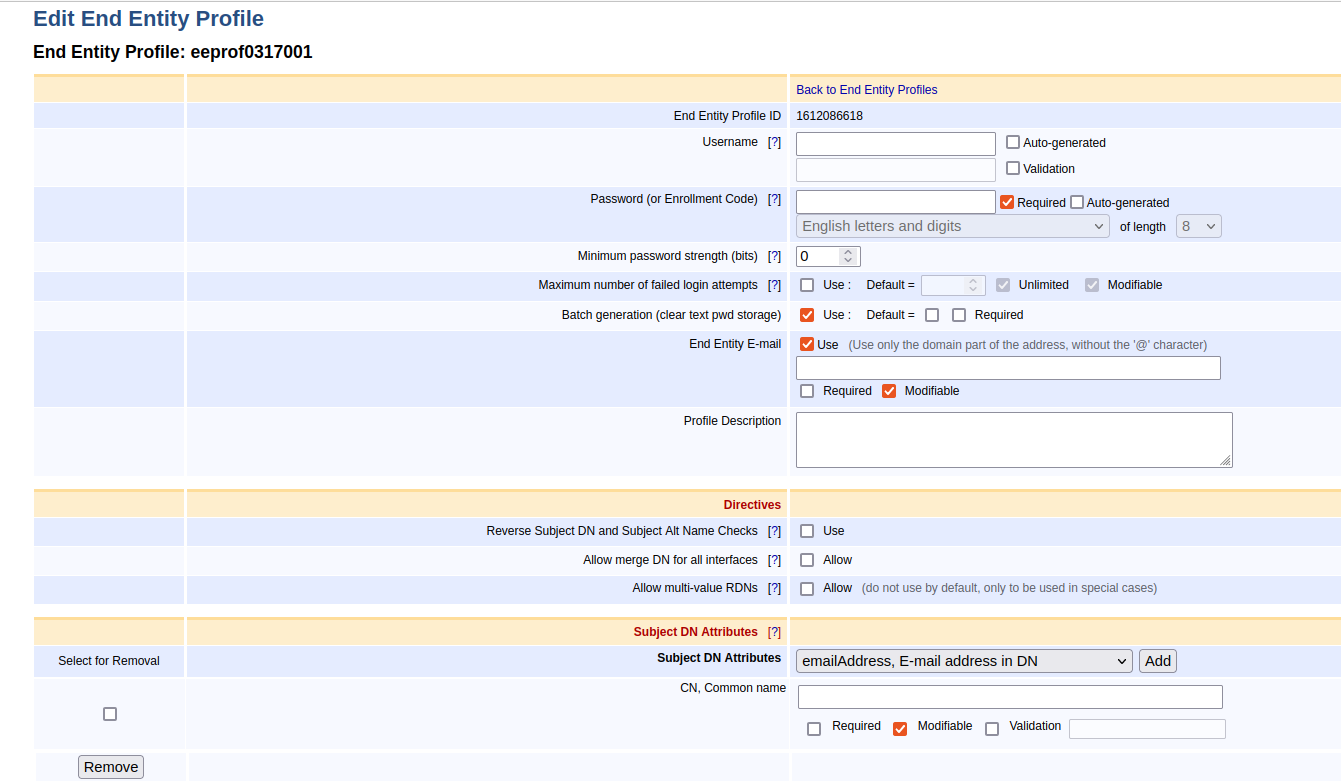
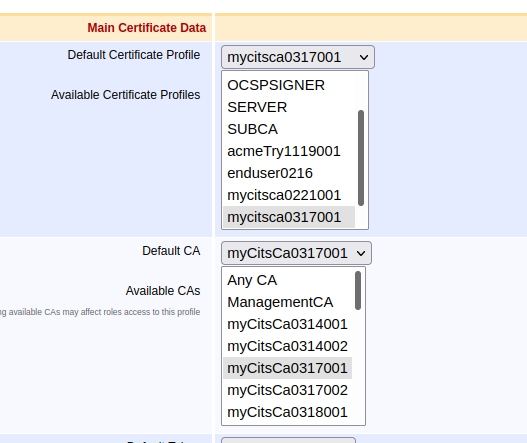
In the Main Certificate Data section, select the Certificate Profile you created earlier or create another similar certificate profile of the type ITS from the multi-select options in Available Certificate Profiles.
Select the same certificate profile in Default Certificate Profile list.
Do the same for the CAs and select Available CAs and then update the Default CA.
Scroll down to the bottom of the page and click Save.
Register ITS-S and Fetch Registered Data
Following ETSI specifications, the EA must know the ITS-S in terms of a globally unique Canonical ID and a Canonical Public Key. In, EJBCA, this is referred to as registration and is performed through REST endpoints.
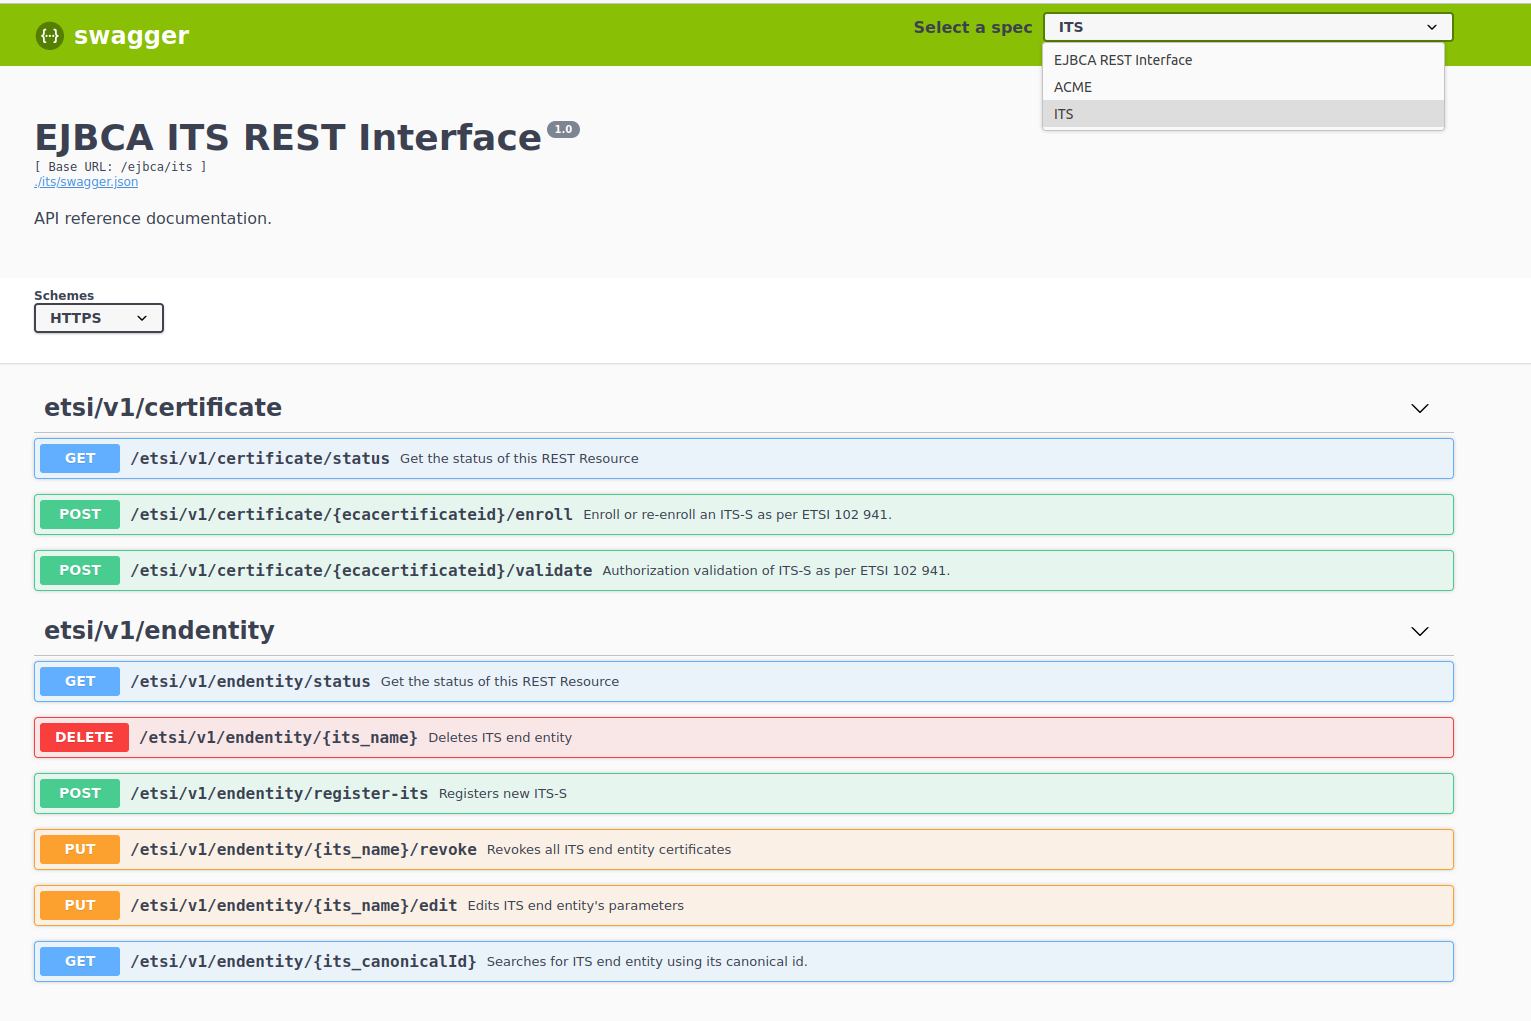
Access EJBCA ITS REST Interface using Swagger
The following examples use Swagger to interact with the REST endpoints. Note that this is only available in EJBCA running non-production mode. Any REST client could be used to perform the same operations. To
access the EJBCA ITS REST Interface using Swagger, perform the following steps:
Navigate to https://hostnamet:8443/ejbca/swagger-ui#/.
In the Select a spec list, select ITS.
Register ITS-S End Entity
Follow these steps to register the ITS-S End Entity:
The ITS-S (end entity) should have a unique name, thus the Canonical ID (canonicalId).
Create a new ECC (Elliptic Curve Cryptography) key pair where the public key will be used for registration and the private key will be used for signing the first enrollment request. Generate the key pair using the following OpenSSL commands:
openssl ecparam -name prime256v1 -genkey -noout -out canonical_key.pemopenssl ec -in key.pem -pubout -out canonical_public_key.pemThe ITS-S registration request includes the following parameters. To download an example request text file, click register_request.txt.
canonicalId: A unique name for the ITS-S (end entity) known as the Canonical ID.
canonicalPublicKey: Use the public key (canonical_public_key.pem) and ensure to remove the newline parameters.
caName: Use the CA name created earlier.
certificateProfileName: Use the name of the Certificate Profile created earlier.
endEntityProfileName: Use the name of the End Entity Profile created earlier.
region: The geographic region is optional. Region can be expressed as a string in the following formats:
rectangle:12,23,34,56;78,90,76,65;
circular:123,56,125
identifed:country:Denmark;country_region:Belgium,123,45,34;
assuranceLevel: Optional. The assuranceLevel parameter value is a positive integer less than 256 as a string parameter.
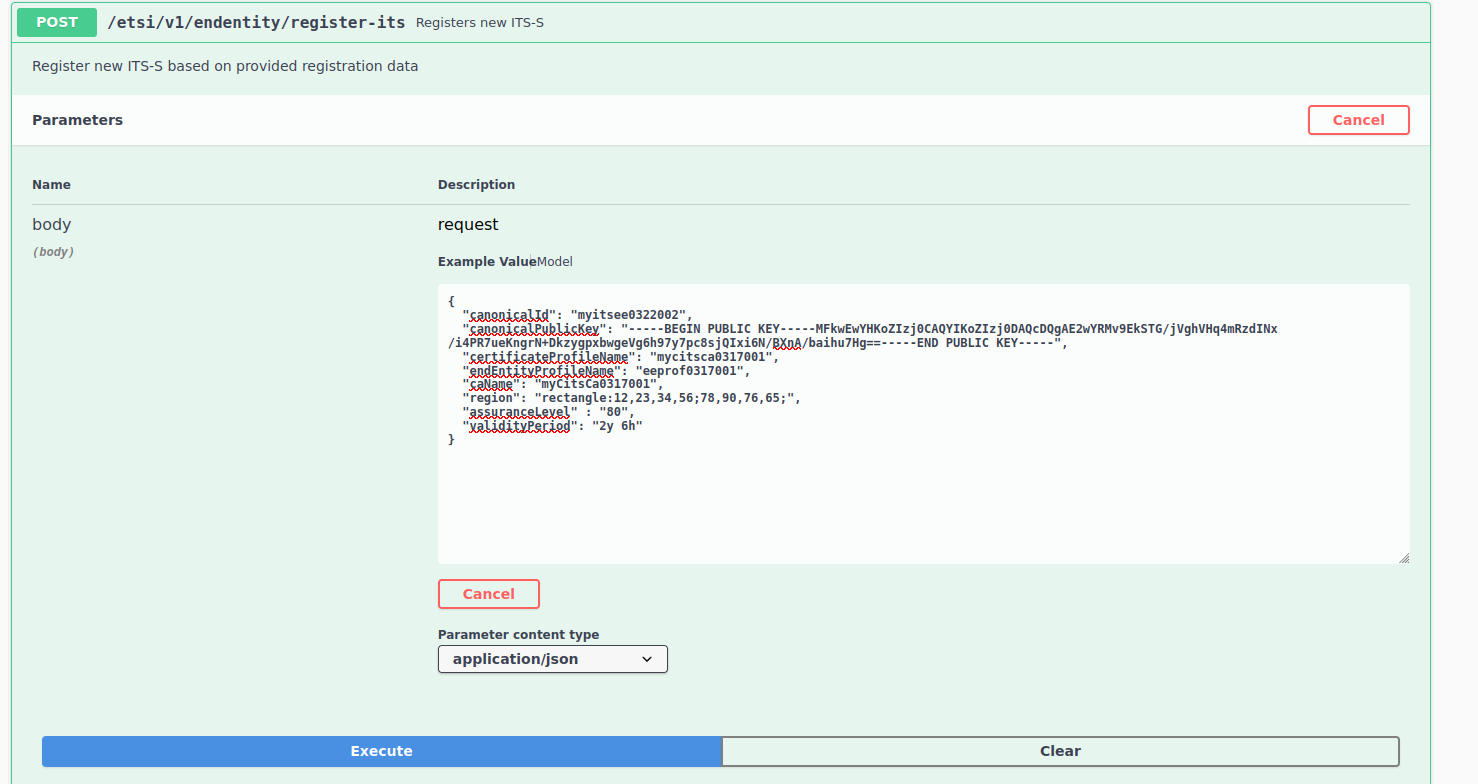
On successful registration, a 200 response is generated.
Fetch Registered Data
Follow these steps to search for the ITS-S End Entity using the Canonical ID and view the registered ITS data.
In the Swagger EJBCA ITS REST Interface, select GET to search for the ITS endpoint:
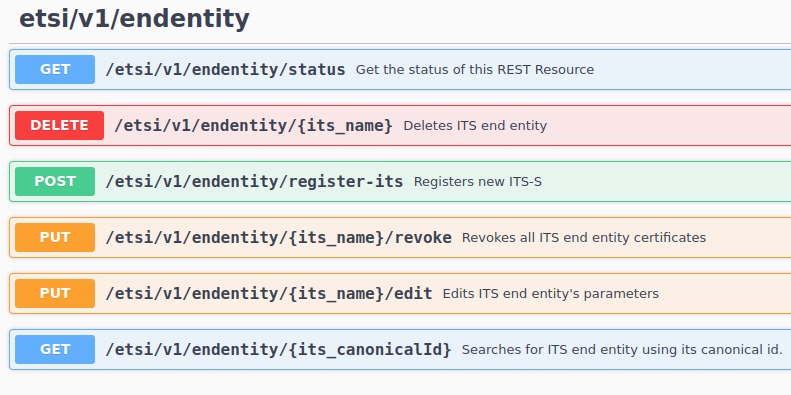
Use the canonicalId to search or view the registered ITS:

ITS REST endpoints can also be used to edit, revoke, or delete an End Entity using the canonicalId as the its_name or its_canonicalId parameter.
Note that only the ITS End Entity's region, validity, and assurance level parameters can be edited.
Enrollment and Authorization Validation
Enrolling an end entity and authorization validation is implemented according to ETSI 102 941 (sections 6.2.3.2 and 6.2.3.3). Both of them accept request in binary format with content-type: application/x-its-request and responds as content-type: application/x-its-response. The following endpoints are used:
Enrollment: https://localhost:8443/ejbca/its/etsi/v1/certificate/{ecaCertificateId}/enroll
Authorization validation: https://localhost:8443/ejbca/its/etsi/v1/certificate/{ecaCertificateId}/validate
where ecaCertificateId is an ECA.
The AA certificate must be imported before authorization validation, see Import AA Certificate.
During the enrollment, the following validations based on requestedSubjectAttributes(CertificateSubjectAttributes) are done:
Requested expiry date is:
Before the ECA expiry date
Less than validity or end date as configured in Certificate Profile.
Less than or equal to when compared to registered ITS data which encodes validity but not expiry date.
Requested assurance level is the same as the registered data or not mentioned.
Requested region is a subset of region in the ECA certificate and registered data.
Requested appPermission is a subset of the permissions configured in Certificate Profile. If not mentioned, all appPermissions from Certificate Profile are used with null SSP which means default SSP in the context of particular permissions.
Similar validations are also done for authorization validation.
Note that the following validations are currently not performed:
Uniqueness of requested certificateId.
Uniqueness of public keys among ITS-S.
Update of public keys during re-enrollment.
Requested SSP by ITS-S on allowed appPermissions are used.
The EC retry feature has an expiration time of an hour and currently only holds 5000 responses.
Related Content
Page:Managing C-ITS ECAs
Page:CA Fields
Page:C-ITS ECA Overview